People often ask me how do I draw that stuff? They’ve assumed I’ve made use of a computer—even back in the 80s… Which my quirky pride takes as a high honor. [I was accused of using French curves to make neat graphs in my 7th Grade Algebra class… using a Bic Pen! –Sinusoidal Brown] But everything is done by hand. Much like my inking brothers and sisters in the comic world. Actually, I think I am closer to Letterers.
I should take a historical step to one side to point out this is so long ago, we had to make our own ink with lamp black, blood and urine… oh, did I reveal too much? Higgins Extra Dense (not, I hasten to add, a description of good colleague Mike Higgins, who is indeed not dense at all) was the ink of choice. For me and my “technical fountain pens” (the proper name of drafting pens) I had to use an ammonia-based ink that was bottled by Rapidograph.
Ahh… the name still holds a steely grip on what’s left of my childhood aspirations. Rapidograph pens were made by Rotring, a fine German precision drafting equipment manufacturer. Often sold under the brand Koh-i-Noor (like the diamond… only a bit less pricey!). When I was a kid, there was a version made for walking around, everyday use. It looked like an old-fashioned fountain pen. The plastics were either weak or I was a little too rough on the one I used, it splintered over time…
When I was a nipper, I wanted to be an architect. To do that, I believed I had to be able to draft mechanical drawings. Those used drafting instruments—T-squares, triangles, straight edges of all kinds, French curves and templates. On these instruments, pencils were similarly precise. One used 4mm “leads” placed in a lead holder! A specific sharpener was used to achieve a needle point that could easily pierce flesh (having a pen roll off the table could go right into your foot—ask me how I know)! My Mechanical Drafting Class days went back so far, I actually learned to use a “ruling pen.” Now that is a deceptively simple gadget. It is still of use when you need colored inks/tempera, non-standard sized circles/arcs or thick lines. I slouched back in time to a near Ecole des Beaux-Arts level of so-called drafting…
In the comic universe, things were less precise but still attention to the technology was needed. You may be surprised to learn that it was the Letterer who inked in the panel borders! The practiced hand would use a fairly standard lettering “nib” (the little metal dingus that caused the ink to flow in a line) held against a tilted T-square edge. One tilted that edge because you could not stuff the nib right into the join of the paper and the straight edge. Infamous “capillary action” would suck a nib-load right under your straight edge as quick as Rick Parker would tell you a hilarious dog story.
All of this back-description is really all about efficiency. At least I had the sense to step up from shaving my own crow quills to using tech fountain pens.
My usual long-winded stories do finally reach a point—this one is about drawing all this crap. Such as the Freedoms Plaza, new Fantastic Four Headquarters drawing I did. I just spent 300 words talking about ink pens. Because I needed something to get the ink on the drawing.
Since it was a building, it needed a perspective rendering (you may groan here). It needed a lot of rendering. We are surrounded by perspective all the time. Our brains turn all the shapes we see into something that makes sense over time. For example, we all know what a 90° angle—a “right angle”– is, we are surrounded by them all the time. Doorways, book shapes, tables, windows… but take a look again. Sometimes we can look at those right angles straight on. But sometimes not. Our brains take that different angle you see and recognizes a straightened out one.
Turning the 3-dimensions of the world around us into a drawing or photo on a 2-D surface like a page, is what artists do all the time. If you look at the room you are in now, the walls are level to the floor and any door opening or corner will contain right angles. If you face a wall, the ceiling and floor lines are parallel to each other and the horizon. If you could extend those lines to the left and right, they would not meet. Except at infinity—or an inaccessible point where parallel lines do meet. And there is the weasel word for us perspective renderers. We can pretend that “infinity” is on our page and draw those room lines the way we want to.
Or… because the real world is full of “subtle” perspective—where the horizon can be seen and we “know” those darn floor and ceiling lines are meeting… a subtler perspective is more realistic. As an architectural renderer, one must try for realism—you’re showing a client what something will look like some day. But subtle is a pain in the neck. The closer we can come to reaching to that infinite horizon, the better your building will look.
Here’s how I do it.
I needed to be able to pencil all the shapes and then ink right on those exact same shapes. Quickly, smoothly and for days on end.
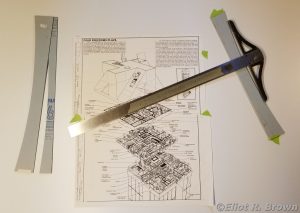
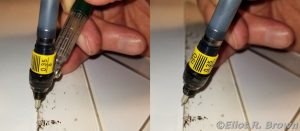
The subtle perspectives here are placing that point on the horizon where those parallel lines meet—now called a “vanishing point”—very far away. In the case of the Freedoms Plaza side where the T-square is, it was 60 inches away. I also had to use similarly distant vanishing points for all three sides. I also had to be able to draw on any of the three perspective lines at any time. Perspective arcs. These used to be made of wood and in different radii—you did just what you see above, you would slide a T-square head along them. If you didn’t have something like that, you could work on the floor and drive a nail in somewhere and use a long stick. Well, it is possible…
But making a set of perspective arcs is a lot easier. A little work with a long string and a very sharp knife and bango! You have your arcs—here made of heavy illustration board.
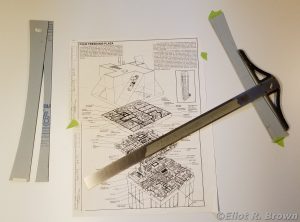
If you compare the first pic to this second one, you can see how the T-square has been slid down a little. The top of the blade still follows the ink lines of the drawing. Once set up and firmly taped down, I could leave things be for the several weeks this was on the board. My wonderful old Architecture professor at The High School of Art & Design, Dr. Erwin T. Mueller, showed off his wooden arcs and told us he would nail them down into his drafting table. Well, those were the days…
Yes, I use templates. When I was working on the Official Handbook of the Marvel Universe, I stuck to simple isometric drawings. They used only a couple of constant angles. All one needed was a 30-60 right triangle and a star to steer her by!
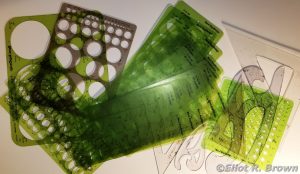
On a few freelance pieces, I experimented with non-isometric drawings. I needed to make things look more realistic. I could start with a more interesting view of something and match an ellipse template to the drawing. So you can just make out a pair of templates that are every 15 degrees and smallish in size along with a light green template of tiny ellipsis! Very useful.
A few years later I did the G.I. Joe Order of Battle #4 in which I had to draw a lot of hardware. As one swept from front to back of any big gadget, the angle of any round thing changed to the viewer’s eye. So, a big expensive trip to Charrette’s (back in the day, the premier architect’s supply house) later and I had a large set of medium ellipsis for every 5-degrees. Having a huge range of ellipsis available made the job much quicker as well as better looking (one hopes!).
The trick to working with tech pens and drawing instruments:
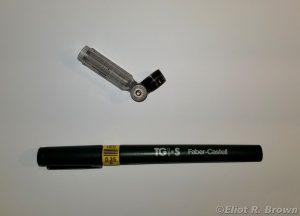
A stencil adaptor.
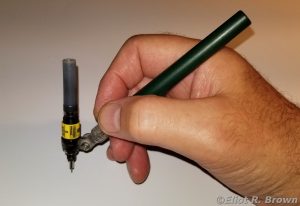
You can see that the hand is in a more comfortable angle to the pen. As a youth, I could bend more to sight down the pen barrel. But now older, I had the right tool.
I had to make some tough decisions along the way. I found that Marvel’s art board had a high mineral content. After OHOTMU, I found my beautiful and expensive set of Rapidographs were worn down, some at angles. Now these things are really small and the way they work is that there’s a fine metal pin inside a tube which acts like a valve. It also frees the surface tension of the ink and allows it to flow. I had worn down that tube in one well-used pen so that the pin stuck out and could get caught right in the paper…
So I found a bullet and bit down hard. It sounds crazy but nickel steel was not tough enough for some jobs. So they made a type of tech pen with a synthetic sapphire tip. Well, you wouldn’t know from the prices that anything “synthetic” was involved… I had to buy the set of sapphire tipped pens… luckily on sale for around a hundred bucks. In that fateful set was a stencil adaptor. Changed everything! I had to switch “families” over to Faber-Castell, tossing to one side my ruined set of Rapidographs–!
When it came time to do The Punisher Armory, I was able to make the inking more illustrative. [Some say not enough, those lines are still dead—to which I say, I don’t know art but I know what I like. –Brown of Reknown] I could hold the pen on a drawing instrument and go over a line more than once—but at slightly different angles each time. Or change the angle as I drew, which changed the thickness from beginning to end.
At one point in my career, I tried learning inking “for real.” Which means “using a brush” to the rest of the world. The goal of a comic inker was to never put the brush down. Yes, that included techie parts of a drawing, like buildings or furniture. I turned to my old photostatic comrade, Harry Candelario for lessons. I am indebted to Inker/Artist Harry Candelario, who showed me doing this very thing below, but with Micron Markers.
Whatever character those Armory pages have is because of this. The Micron series of pens was for a long time a main stay of inkers around the world. Only less so these days because of the computer graphics tablet and drawing programs. Thanks to the generosity of Bullpenner and colleague, Creator, Logotypist and graphic artist, Janet Jackson, I have a gently used graphics tablet to flog my art with. So look out world!
Last tip:
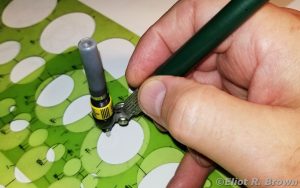
How to bang out an ellipse like nobody’s business! Even with a stencil adaptor, it is possible to wobble your angle and stuff the pen under a part of an ellipse. Sploosh! Inkie sorrow. But if you elevate the template on another template… well, you see… inking perfection at last!