Sculpting and Casting a Resin Statue
Using Sculpey, Armature Wire, Acid‑Etched Brass and Rubber Molds
Chapter 4: The Sword and How To Acid-Etch Brass
From the previous chapter:
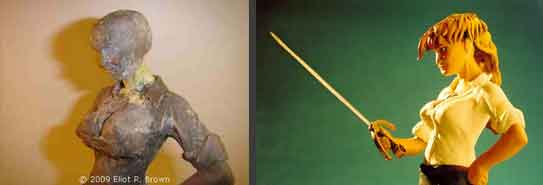
At this point, Shaundra got a little tougher. Her shirt was to conceal her bosom, except for some cleavage. But then what about the head? If I kept the chest in one piece, there would be another hard to get at seam at the neck. Then it hit medo the whole head down to her cleavage as one piece. It could socket into the body.
Acid-Etching Brass! You can do it too.
The sword was a major modeling challenge all itself. It would also establish how the figure held its “sword” armso it had to be started.
I took some time here to whomp up a test sword and see how things worked out. I looked over some of Philo’s pages and found several images of Shaundra’s sword. I selected one or two and then drew one on a piece of styrene. (The study I performed for the sketch image was mostly to establish proportions and some overall shapes. This one was to cut out “full size.”)
I did have access to the artist, so when my original sword looked “funny” to Philo, I turned to later close-ups of the sword. Philo and I disagreed on certain pointsI said they were in his art after all, but he swore that wasn't what he meant. So, okay! I said, send me a shot that does say what you mean! He sent me the “silhouette” you see above.
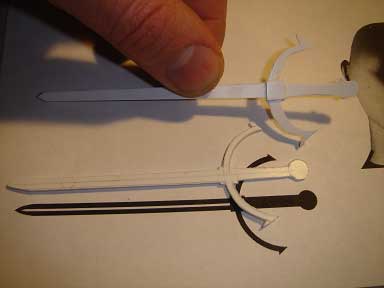
I then scanned that into my computer and imported it into Illustrator. At this time, I could better “see” that the pommel was very, very thin and the grip was a cylinderI think you can see the top sword, cut out of styrene, has a heavier pommel and an indented middle to the grip. The bottom sword, which follows the Philo original silhouette, is very thin! Finally, there was a “soul gem” located in a circular feature at the very bottom. So I had to figure out how this model sword was going to be built.
In the meantime, I could set up the sword with the figure and position the arm.
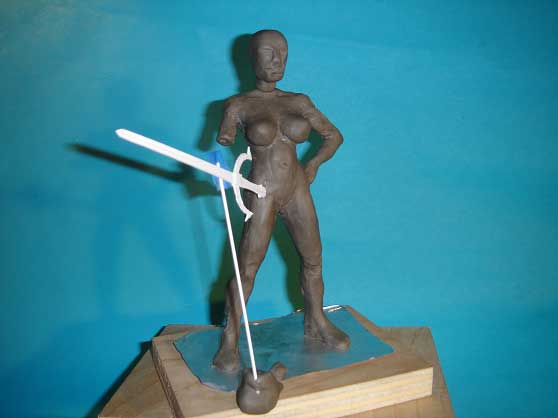
Here you can see the pose is a little wide but a good enough start. It established that the length was right. This was also a “head start” (hah!) which I soon chopped off and started again. At the time, I decided I needed to lean into the sword.
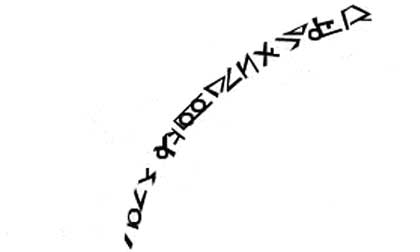
I had to figure out how to do the “mystic runes” that are a part of the pommel. I consulted with Philo who graciously provided me with one nice, pommel piece with neatly picked out runes.
After he sent me the first one, I realized I would have to move to acid-etching brass for such fine details. I was going to scan his artwork and “trace” over them in Illustrator. Then, with Illustrator, I could flop and flip the artwork to make all four faces of the pommel. Right then it hit me, I was going to go through that much trouble, why not go all out! Here’s where it helps to know the artist, as I could berate and cajole him into doing the other three sets of runes.
Here’s the first oneyou’ll have to take my word, I now have four different sets of runes on Shaundra’s sword! It seemed too much a cheat to simply do all four from the same piece of art. Would anyone on earth have noted save for Philo and I? Most likely not. But it’s more fun this way.
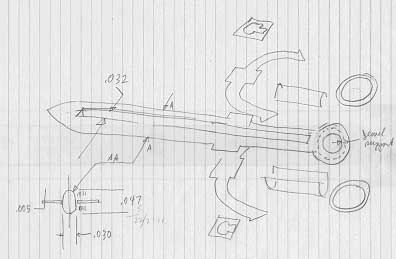
You can see that the need for thin brass was essential. This was a very long and thin object. It would be cast in resin. But even at this stage, not much else would capture the detail and thinness. I would do the entire sword in etched brass. In the gap that runs down the length of the sword, would go a thin brass rod. This would replicate the thin blade, with a central bulge that Philo claimed was the design.
It’s important to note that I dimensioned the entire drawing in decimal inches. The brass sheet and rod are sold that way and are very precise. Thus it is possible to do very accurate work. Since I had to be trained to work with decimal inches, I cannot assume that everyone knows how to do the same. But I'll keep it brief. We all know what a decimal point isit helps divide the whole numbers from the fractions. In decimal measurement, the first digit to the right of the decimal point are tenths of an inch (we are doing this in America where inches still rule! Of course, this applies to any measurement system). So for example, “two tenths of an inch” is written: .2”. (Note that it is important to use the inch symbol each and every time, also grammatically, the period does not intrude in a measurement system!) The digit one more space to the right would be hundredths of an inch; three hundredths of an inch would be: .03”. Finally, for our purposes, the next digit over to the right is thousandths of an inch; eight thousandths of an inch would be: .008”. (There is a whole lecture about tolerance or accuracy possible but, for us, close is generally good enough.)
A practical example that involves all three places, is the whole fraction 1/8”. That becomes .125”. You would say this, “point one two five inch.” There is a common usage of material handling that not only makes you sound like an old hand in a machine shop, but invokes some of that accuracy thing I mentioned. If a thickness involves hundredths, for example, a piece of plastic that is .030”you would say that out loud, “thirty thousandths of an inch.” What you've done is go one decimal place further than you might expect, which tells an engineer that this is supposed to be very accurate. That there are “zero” thousandths of an inch and that the “three hundredths” that is there is all there is. Since this has slipped into common usage, some sloppiness has evolved. Different materials are labeled with different tolerances. Brass sheet is very accurate. Styrene sheet not so much. Places like Plastruct, a well known plastic shapes supplier, works to tight tolerances.
End of lesson!
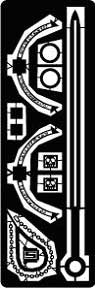
Above is the artwork that I did in Illustrator to make all the brass bits of the sword. For something a little different here, the runes and the “skull” don't need to be eaten all the way through the brass. They can be half-etched. This only takes a little fore-thought and I will talk about that in the middle of the etching process below.
Acid Etching
Now! Acid-etching brass is not as hard as it might seem. It’s a lot easier with Illustrator, I can tell you. You can still work with hand drawn art or when appropriate masking tape or ink. But it’s harder to get good results.
Photo-etched brass is a fairly exotic manufacturing process often called “chemical milling.” But that simply means that you did not use a metal-working milling machine, which can introduce heat stress in the material. You have numerous etched brass pieces and parts all around youfrom your wrist watch, to your calculator, your ink jet printer cartridge or your electric razorall use etched metal. The process involves applying a “resist” that, uh, resists the attacking acid. If the resist looks like a number and is placed on a piece of metal, when the acid eats the metal around itthat’s what will be left behind, etc! For modelers it allows you to make very precise, very neat and tiny pieces of detail that make use of the strength of brass. The “photo” part refers to the good old days of when the use of photographic negatives were used to make exposures of the art on light-sensitized brass. Oh, those good old days were great, but this is easy enough to do with your home computer/printer and in your kitchen.
Modelers have used etched brass for making eye-popping details on model ships for yearssuch as radar masts, railings, ladders, doorsall sorts of things. Also, for figure work, belt buckles, eyeglasses and swords!
There is a system of brass etching sold by Pulsar. It involves using a copy machinedry toner only! The artwork is printed on a special paper that is affixed to the brass with a laminator. Then a special layer of protective material is applied on top of that. A sheet of brass has two sides, so one needs to protect the back of the brass so that the bare metal is not etched tooso I paint it with auto-body primer. Instead of stinky ferrous chloride, I use ammonium persulphate. Much less odor and little chance of permanent stains, as with FeCl.
Here’s the list of materials and places to get them:
.003” brass shim stockavailable in sheets and rolls. I have settled on .003”but also have tried .005” from: http://www.mcmaster.com/ which has a real irritating home page. Just look at all those listings--find "Raw Materials" at the bottom of page, look for "shim stock.” On the shim stock page you will find many choicesgo for the 4” wide roll, it’s a good start.
Pulsar itself seems to have gone through some changestheir website is harder to look through. It seems assumed that you know what and how you want to do what their equipment will do for you! Ahem. Take a look:
http://www.pulsarprofx.com/index.html
Printed circuit boards are a close cousin to brass etching. I make use of their method to make circuit boards in one batch and then etched brass in the next. Once familiar, it is very simple to do.
Basically: You do your own artremember to “reverse” type or anything “handed” like something that is oriented in a certain direction. You can “test” by outputting a print on paper. You can check for fit or size this way. Remember-- the art is reversed during this process. Print it on their “toner transfer paper” with a toner-dust printer. You clean your brass with Scotch-Brite very carefully! You do not want to wrinkle the surface or “grab” a corner and with the pad and bend it up. I also wipe down the surface with a gently but forcefully applied paper towel. I go for a pristine, pure surfaceno cleaners or solvents. One cannot tell what the transfer stuff will or will not like, nor how good your cleaning technique is. Place the TT Paper on the brass and run it through a laminator. You can use most laminators when doing brass only. But if you also wish to do printed circuitsmuch thicker material-- you should get their laminator. (You also need to locate thinner PC boardsCircuit Specialists carries that. .064" is normal, .032" is what Pulsar recommends. Follow their instructions.)
Then you run the hot brass-with-TT Paper in cold water and peel off the backing. If all is good, the art is now perfectly stuck to the brass. Dry things thoroughly, but gently! I also simply place the “damp” brass on top of the laminator to heat up. Apply some of Pulsar’s “Green Toner Foil” which is essential to a good etchthis seals the toner dust and gives you near-professional results. This stuff, you let cool off first. Then peel straight back against itself. If all goes well, the art is now nice and green.
Then I apply gray primer from a spray can to the back. If you did not do this, the acid would eat all the way through the back. The whole piece would dissolve.
Now “acid” time! I use cheap machinist’s “chip” brushesbut 1” disposable paint brushes will do. I set a small tray of “acid” inside a big tray of hot water. Ferrous chloride will eat the brass away, but is terribly smelly and a single splash on the wrong thing will stain forever. Ammonium persulphate is a very good alternativefor both brass etching and printed circuit board work.
You can get ammonium persulphate and thin (.032” single sided) printed circuit boards from Circuit Specialists, also known as:
http://www.web-tronics.com/index.html
You can also get a lot of stuff from these guysbut that’s for another subject! You will also need a gallon jug. I have had a gallon-sized nylon mixing container for yearsI believe you can get them at any good photo-supply shop. (Or on-line!) Having a big mixing thing makes life a lot easier.
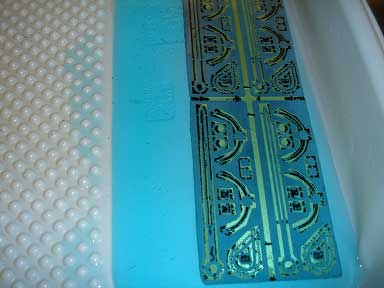
Then you slide the brass into the soup and brush at it gently. This dislodges the little bubbles that form at the boundary of the green stuff and the brass. In about 25 minutes, you will see the gray of the paint show through! Then into a small tray of acetone (unavoidably stinkybut quick).
I recommend the use of vinyl gloves for most of thisbut acetone will eat thoseso get em cheap and disposable! I try to work “green” and you are supposed to be able to flush ferrous chloride or ammonium persulphate down the toilet. Down the sink too, if you run water at the same time. Acetone, so little is used that one can soak it up with paper towelsalso clean up the trayand enclose it in a plastic shopping bag and throw it out.
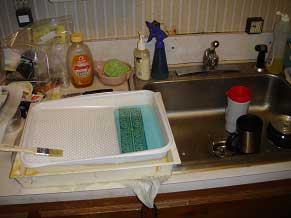
Ah, home, sweet home! On rare occasions, I do the dishes first and spread more plastic bags on the counter top. I also work slow and methodically, so as not to splash the stuff around. The persulphate will make interesting little holes in your shirt.
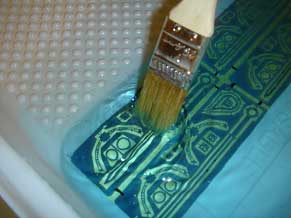
The acid at work, note the shiny brass. The effect of the resist is clear.

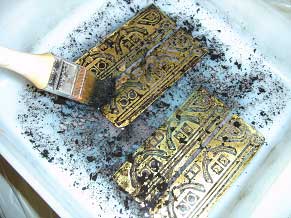
Now I do something a little different here! As I mentioned earlier, the mystic runes and the little skull design were not going to be eaten through. I stopped the etching process at the “half-way” markabout 15 minutes. Then I applied artist’s ink (F-W Artist’s) to mask the “runes” and little skull heads (part of the sword), so that they would stay half-way eaten. I used an old-fashioned technical fountain pen, but you can use a fine brush. Then I put it back in the acid so as to finish eating the rest of the brass.
(Note: the green resist looks gray because of an artifact of the camera!)
Here you can see where the half-etch will stay and the rest of the brass will be eaten away.
Messy, stinky acetoneI used the same brush as the “acid.” I rinsed it first.
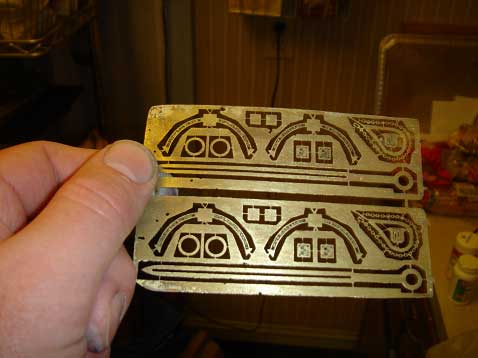
I love it when a plan comes together! You can just see that the “runes” are in high relief!
So this looked good, but now I had to assemble it. Much easier to let that slide and finish the body and sword arm. I had an idea of the size of the sword now to fit it to the body. Something that changed was how Shaundra carries her sword. In the comic, there is a leather sheath that actually hangs diagonally across Shaundra’s back. I was going to do that, but Philo convinced me that it did not have to besince he liked the pose I had in mind. So the option of showing Shaundra with a sheathed sword and a second arm option fell by the wayside.
Back to the body.