For 15 years (2000-2015) I founded and ran warmplastic.com, a company that made low cost alternative vacuum formers for hobbyists
This little business got started by my shooting off my mouth. Isn’t that always the way? I was researching some of the German “wonder weapons” around WWII with a friend and spotted the Sanger-Bredt Spaceplane design. I remarked that it was the perfect subject for vacuum forming and subsequent modeling. The flat-topped and slab-sided design with large radii joining them were perfect. My friend said, great! Can’t wait till I get one!
A long time ago, my ever-patient wife had gotten me a small, home vacuum former. This table had something that made it very appealing: an electric hot plate side! This followed a standard vacuum-forming table design, which was two sided. One was the vacuum part and the other had a heated part. What is not apparent about sheet plastic is that, once heated up it will act more like limp balloon rubber. A frame has to be used, as plastic has a “memory” and will revert to some primeval form when heated up. In commercial tables and this little guy, the frame was on a hinge that allowed it to swing from the hot side to the vacuum side.
It made use of a fairly conventional metal picture frame. What was unconventional was a pair of L-shaped inserts that were screwed into place on the inside of that frame. One had to punch out a dozen holes in the plastic, then thread through some bolts into some nuts. Very time-consuming and fidgety. Plus it didn’t work as sold—what I realize now is that those L shapes had cut metal edges. They were sharp enough to cut the plastic and thus break the seal around the inside of the frame. Frustrating. I mention this in the middle of the story because I tried to make it work on my spaceplane model. I actually but my pattern in two to fit on the table! As I say, ‘frustrated.’
In the wonderful modeling mag, Fine Scale Modeler, there was article after article about how fellow modelers would make their own table. There was one fellow who placed plastic between two screwed-together metal frames and held this over a gas stovetop. Holding the frames in his hands with rags! Then there was a fellow who literally made a vac-former out of a cardboard box used for wine bottles. He kept the bottle inserts and taped a piece of mosquito-netting on top. He duct taped his vacuum cleaner hose into the bottom of this box. Then he stapled a sheet of styrene to a piece of Strathmore picture frame. He balanced his carved-wood shape on top of the cardboard inserts/mosquito net, heated up his plastic somehow and got as many forms as he needed!
These articles of matter-of-fact success infuriated me! As I say, I had shot off my mouth to my chum, had moved upstate and now had a basement.
For no apparent reason I had a drill-press for years in my tiny Manhattan apartment. When I moved upstate I discovered the world of garage sales and found a table saw. Within a week of fussing around, I had a working vacuum former. I spent time fabricating my first “buck” or pattern. I had once worked at a place just down the avenue from a plastic shop and ordered a couple of gigantic sheets of styrene from them.
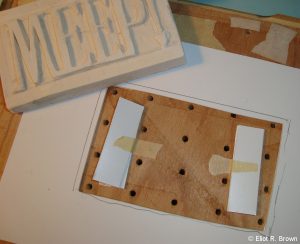
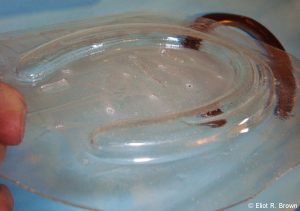
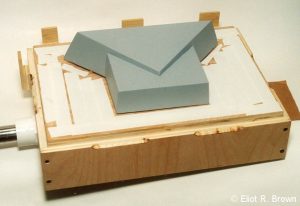
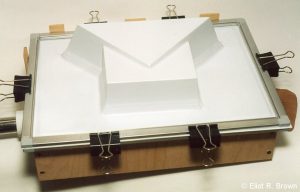
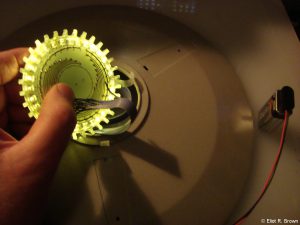
This was mid-1999. This is what it looked like:
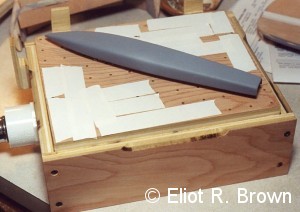
Note the taped-off holes to concentrate the vacuum right under the pattern. This would pull the plastic tighter into the gap. Making a vac-formed model is far different from an injection-molded store-bought model. When the shape is cut from the full sheet, what one is left with are egg-shell edges and thin walls. There was much more to build from raw materials.
The very first vacuum form “shot” I made came out perfectly! I went on to fail for the next 4 or 5 attempts. But I was encouraged enough to press on.
This is the finished model:

Alas, my friend had passed away before I could give this to him. But I thought this wasn’t such a tough model to build. Since no such spaceplane had been fielded by the Germans, its coloration and markings were fair game. I found all the reference I could and even managed to contact the Sanger family for permission to issue a model of this subject. For a few years, mine was the only kit version out there.
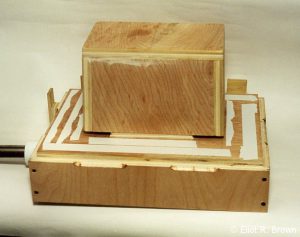
I also had a vacuum former design that I could make from my home. Thanks to the young internet, I could also sell them. I spent a good deal of my start-up money on print advertising. Not content to make a one-size-fits-all version, I designed a fiendishly complicated model that had two forming tables built into one! The Kingston Duo:
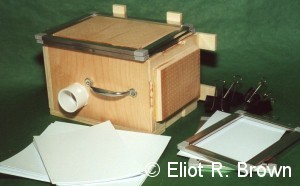
I quickly realized I would have to step up to becoming a student of fine carpentry—till that point, all my experience was from books and TV’s The New Yankee Workshop! So I abandoned the two-faced model and concentrated on a series of useful sizes. I am no lover of the practice of fine carpentry. Far from it! These tables were designed to be easily made by me and so that any sloppiness would not affect the performance of the tables. For example, all the corners have a rabbet, which is a notch that the adjoining piece of wood fits into. If there’s a gap, it’s only on the outer surface. There’s a piece of wood with a blob of glue still sealing the corner.
I used to finish the tables with a urethane polymer finish. One day I started up a long run of plastic forming. After about 10 minutes, I could feel that the finish was softening. Alarmed, I discontinued that practice and the wood is now raw.
Here is the “New Family” sometime in 2001:
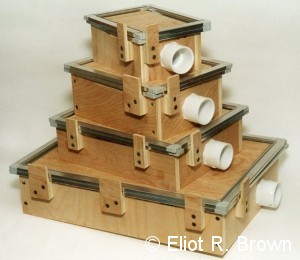
This tower is minus the smaller Canopy Master, which was asked for so many times I finally put it on the website in 2003. The IPMS (International Plastic Modeling Society) used to sell a simple metal frame with which to hold a small piece of clear plastic over a candle. This was to make thinner, more “in-scale” versions of plastic kit airplane canopies. You forced the heated, softened plastic over that canopy to make a copy. I sized my smallest table around something I could safely hold in the table saw. I also realized that the Can Master was a good deal for any foreign purchasers. The international mails are cruel and uninviting!
Because I had such a great first experience with my own vac-form project, I decided to sell each table with plastic. When I saw the plastic just snap down around my buck, I gave a cry of delight. In fact, on the few times I had a local customer come over to be shown how it’s done, they too gave a child-like cry of glee. I wanted every customer to have everything they needed to get started as soon as possible. If they already had a pattern all they had to do was wait for the oven to warm.
When I started there was a fellow selling a kit of pieces to assemble your own table. There was a rather audacious fellow who would show off a commercial grade table and then offer to sell you plans for a very elaborate , fairly expensive table. Both of those fellows seem to have faded. But along came someone else who had figured out something my wife (IT Officer) and I had not: eBay! To be competitive, I had to match him and give up including plastic with each order. The customers of my primary competitor didn’t seem to have noticed that by buying plastic at the same time as their table, they were spending as much or more than on my tables. To be fair, those fellows built a better table, very close to the same design, just better made. Their only oversight was not mentioning that some of their tables would need a larger oven than was in most American homes. Unless their clients had a pizza oven handy! All of my tables would fit in a conventional American kitchen oven. And include a support to keep the plastic off the oven rack!
Those guys do one thing going for them that I did not. They use metal insert corners for their aluminum window-frame “rails.” This means their table can handle the higher temperatures that polycarbonate (better known by the brand name Lexan), ABS and acrylic require. As well as Kydex, newly discovered for holster makers and knife sheathes. My easy-does-it approach to making the metal frames involved a thermoset-plastic corner that allowed me to use a much simpler butt-joint. But those corners could soften if the temperature was set too high. Not so, the all metal type.
A short internet search will find these gents and you will see that their product is top-notch. Whoever does the work on their shop floor makes a very nice job of each table and right here in America. I was never so inclined to make such neat “furniture” for my clients. My tables are tough indeed! They could well serve as foot stools when not vac-forming. But they were never intended to be display pieces. I knew that the design worked and could work well, so I never spent time neatening bits of fluff from the outer skin of plywood. Or caring too much about aligning parts.
One of the reasons I am closing up shop is the learning that some customers expect the best no matter for what purpose. One fellow pointed out that he could have made the vacuum former that I had sold him. All it was, he allowed, was a box with holes drilled in it. I pointed out to him what I have pointed out on the website from Day One: Can you build this yourself? Of course! All I am doing is saving you the trouble of walking up and down the aisles of Home Depot or Lowes. Perhaps I was uncharitable to point out that it was also much easier to make something once you’ve seen how it was already made.
I encouraged him to please send me a picture of his eventual labors. I am hoping for several coats of varnish on that hardwood and brass trim… perhaps a green felt-lined cover with hinges and a lock… It’s been many months so far and no pics. I am hopeful.
Another fellow observed that there were too few holes to get a successful pull. To circle back for a sec, not long after I started, I found online a group who built body armor for Star Wars storm troopers, in what is now more widely referred to as “cosplay.” The plaster pattern for the chest piece was so large, the plastic-with-frame stuck out of the oven! Also their forming table had only one—repeat: one—hole in the center of their hand-made table. They were forming .080” styrene. Okay, back to ‘now.’
Prominently in the instructions is the observation that a vacuum cleaner is really a fan. As such, the “vacuum” it generates is only so good. A commercial vac-former is all-metal, one part of it is a metal tank that has a vacuum pump on one end and a metal tube that runs to the forming table (“plenum”) on the other. That metal tank is evacuated of air to a “good vacuum.” There is an electric valve between the two.
When the valve is opened, the violence of the rush of air between the two chambers is such that the plastic does not have to be very soft to make a good form. This process is also quick. The plastic provides the seal to all the little holes.
For the rest of us who use a vacuum cleaner, the fan will reach equilibrium between the whole table system and the outside of the vacuum cleaner itself. At that point it’s all over. I go on in my instructions, to say that how we compensate for that lack of power is to overheat the plastic. When styrene sheet heats up it will sag a little under its own weight. One must let it sag quite a bit for “taller” objects that stand off the table. I go on to say that time is of the essence. One must move quickly from oven to vac-table. In those commercial machines, there is generally a heating area attached to the table. It is either to one side or directly above the vacuum part.
I also point out that experience will teach you more than anything else. The first few shots are bound to be bad. It’s also a way to see how your buck is working. Some changes might be needed. Elaborate designs can be hard to predict. My general advice is to look at things like poured candy bars (Nestles, Chunkies, etc.). They show what is possible. I recommend using Sculpey to make patterns. It is already heat resistant and you can run a heat gun around (quickly) on it, a lot. Then there’s the complication of chocolate molds, or any finished shape that needs a large flat area around it. One needs to be able to scrape the bottom of a choco mold with a spatula. The little bumps from all the non-essential holes can be a problem. I took a sheet of plastic, cut a hole smaller than the pattern base, lifted the pattern just a little bit to make a gap…
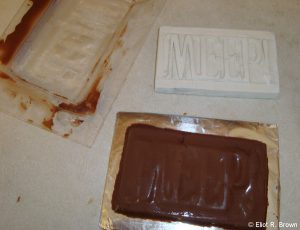
On the left: Scuply, not tapered sides, rounded corners and low lettering. Right: one thickness of plastic to make the flat area and two thicknesses of plastic to elevate the buck.
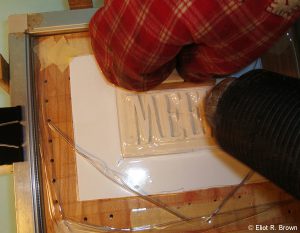
Then, the forming itself. In the pic on the left, one can see the barrel of a heat gun and a small stick of wood in my oven-mitted hand. I wanted tight, sharp corners down to the table top. Because this was a literal “one off” (I made 3-4), I was not going crazy about the sharpness of the letters. All “one” had to be, was legible. But, if you need sharp lettering, a rounded, pointy stick can get the job done. But it’s time-consuming. On the other hand, the results can be terrific and a small set of molds can remain in service for a long time. Thus it can be a good investment of time.
Chocolate is hard to remove from a mold. Enough cocoa butter will act like a mold-release. But the chocolate still has to be easily lifted from the mold. Designs that call for lettering on the top-side can be done. I hope that the lettering is fairly large. Use a heat-gun to gently soften the plastic. Use your oven-mitted finger to push the plastic into the indented letter shapes. Small, raised lettering… essentially impossible.
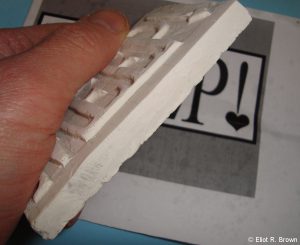
Many people who call in for advice about forming plastic or chocolate mold-making in particular, have heard me go on and on about the horse shoe chocolate mold. Well, here it is:
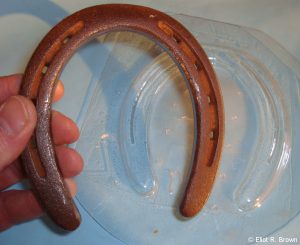
Yes, that is a genuine iron horse shoe, from a very generous horse ranch lady! I’m showing this because this was before I knew about the nice feature of a flat area for scraping, around a chocolate mold. The guys I made this for are full-time chocolate makers and they said, no problem. So there you have it—your decision. I included both approaches because some of it may be useful to someone.
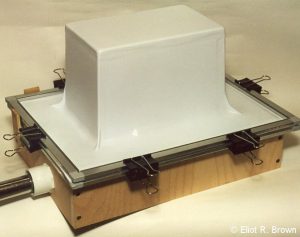
The “showstopper” for me was what I called The Big Box. This was a challenge from an acquaintance who wanted to see if my tables could make a sun-shade for a video-assist monitor. He told me the specs, I didn’t know if it was possible. I was sure curious. So I ordered up some .125” (1/8”) styrene and built this enormous box.
Pretty imposing. Almost 7” tall. The bottom is around 10×6”. This is the experiment that showed me the thermoset plastic corners could not do a lot of these. The .125” plastic needed to stay in the oven for 12-15 minutes! The shots were okay, around the third one, I got it down to the table. With each shot I raised the box up a little more—there was a wicked web forming at all 4 corners. By raising the box, I got the webs to form off the part I needed. The corners got wobbly between the 3rd and 4th shots. Because of the clamps on the sides, one could pick it up and place it. But that was not for the faint of heart.
Anyone on warmplastic.com could have seen this pic:
In the meanwhile, I would like to show some more tips to those who will be vacuum forming without me!
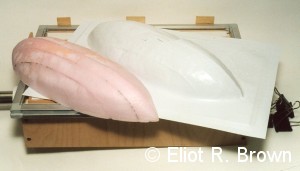
I named my largest table The Zeppelin Master before seeing if it would work to form a Zeppelin! So I made a quick carving from the “pink stuff” and yep, it worked. A bonus was that it turns out this stuff is porous. So the vacuum pulled through the material. If I was going to finish the pink stuff, I would use vinyl wall spackle and finish it to whatever degree I wished. One can even carve into and sculpt the stuff. If I was making a rough-and-ready shape, I would simply take this form, punch some holes around this and make a second form over it. Much smoother.
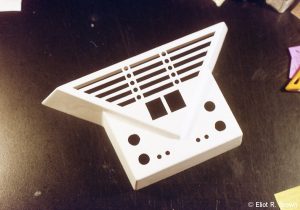
Above is The Kingston Vacuum Works’ greatest failure! The low-brow cineasts among you might recognize Dr. Evil’s intercom/minion dispatcher. I made one for an old friend and great fan of Austin Powers International Man of Mystery. But there was this huge buck left over and I decided to make a kit. Worried about infringement troubles from the movie company, I called it something else, something clever, Professor Bad’s Blinkie Box of Terror. In retrospect, I can understand why no one could find it. Positing they were looking, of course. Didn’t sell a single one!
To demonstrate the need for improving one’s pattern—the sharp-eyed may notice that the pic on the left has the pattern simply lifted up from the table—note the gap around the pattern. That turned out to work poorly. A phenomenon called “webbing” happens under obscure circumstances that have something to do with how much you ask the plastic to stretch and where intersecting planes meet. But the webbing was ferocious. I hit upon the idea of “giving the plastic somewhere to go.” On the right, you can make out that the pattern sits on top of a short pedestal with angled sides.
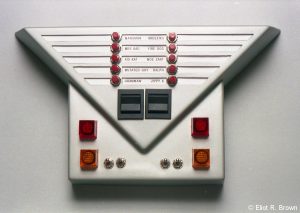
Some of you may now be able to recognize Dr. Evil’s “annunciator!”:
No one said making a vac-formed model was easy. Especially the prototype!
Fedoratron.com is still open and intends to be for a long time! There are several new kits that are close to being finished. Let me entice anyone who’s gotten this far:
Brass window patterns for the 1:537 and 1:1000 Klingon D-7, shown here is the paper test:
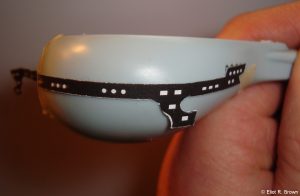
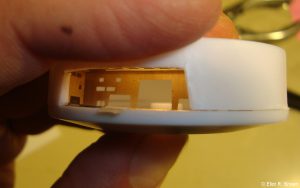
For the K-7 Space Dock kit:
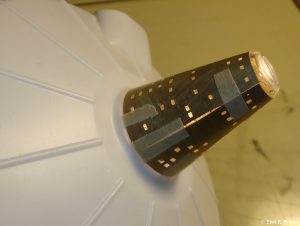
Brass window patterns, copied as faithfully from the shooting model that was copied by legendary modeler Greg Jein and used in Deep Space 9 Trials And Tribbleations. I was considering re-doing the entire “ice cream cone” shape with curved sides. But that was too much. This is pretty good.
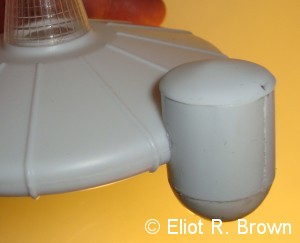
On top of this goes a light-up beacon that looks like the one on the TV. Not the kit part, which looks like a stick shift:
![]() Did I mention it lights up?
Did I mention it lights up?
![]()
A whole new shuttle bay, made with lighting in mind (and tiny TOS shuttles too):
Get out your razor saws and putty! A replacement for that oddball lump where this is supposed to be:
Still got your 12” Polar Lights Jupiter II? Afraid to light it? Here’s your fusion Core:

Lighting and more for extraordinary modelers